According to data from market research institutions, more than 60% of enterprises choose to mix surveillance equipment from different brands when upgrading their surveillance systems to maximize cost-effectiveness and functional complementarity. Connect Dahua IP camera to Hikvision NVR is a typical example.
This cross-brand integration not only makes full use of existing resources, but also enables more powerful surveillance functions. In this guide, we will guide you step by step through the entire process to add dahua camera to hikvision nvr while avoiding unnecessary equipment replacement and cost expenditures.
Connect Dahua Security Camera To Hikvision NVR
Step 1: Initial Setup and Software Installation
Before you begin the process of adding Dahua camera to Hikvision NVR, there are some crucial preliminary steps to follow:
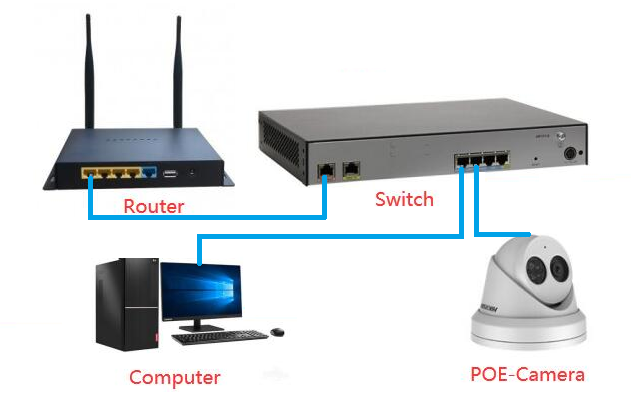
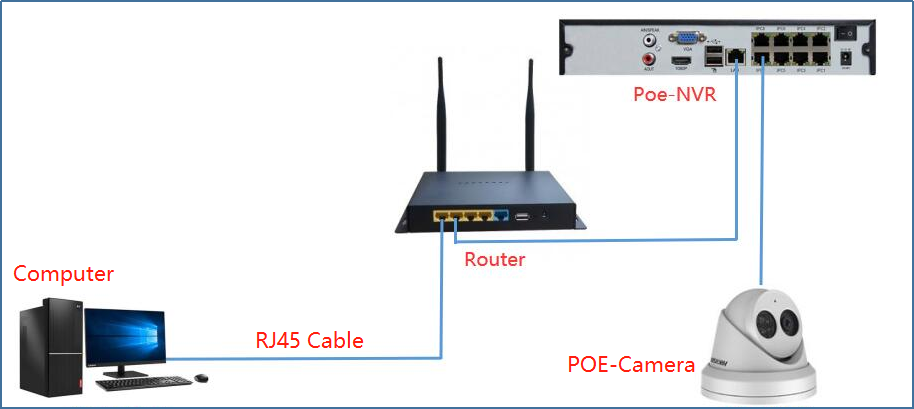
- Connection and Software Installation: Start by connecting your Dahua IP camera to your computer using the appropriate cables. This initial connection will allow you to configure the camera’s settings before integrating it with the NVR.
- Simultaneously, download and install the “ConfigTool” software from the Dahua official website. This tool is essential for discovering the camera’s IP address and making necessary configurations.
Step 2: Discovering the Camera’s IP Address
Once the ConfigTool software is installed, you can locate your camera’s IP address, which is crucial for the subsequent connection process:
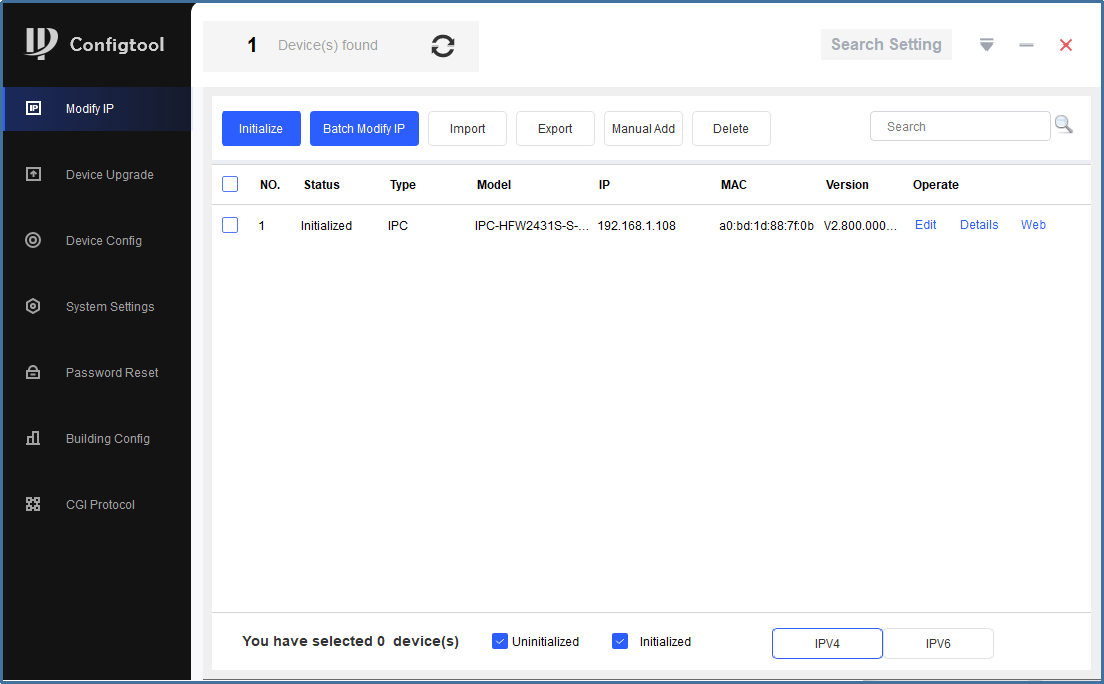
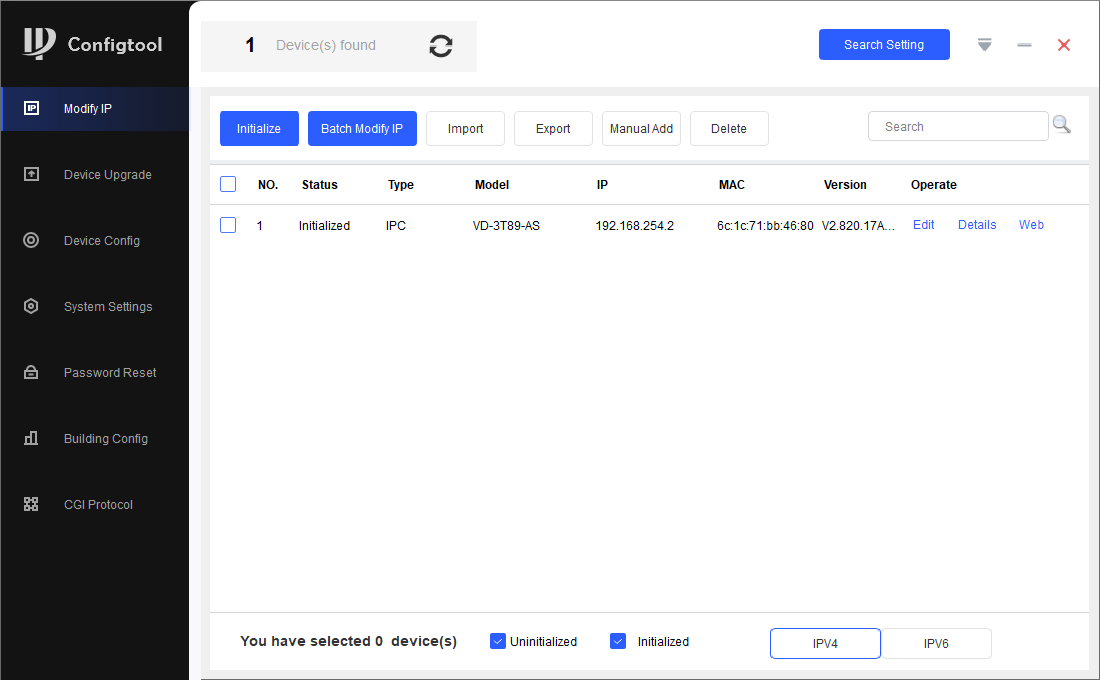
- Launching ConfigTool: Open the ConfigTool software and initiate a search for connected devices. This step is vital as it helps identify your camera within the network.
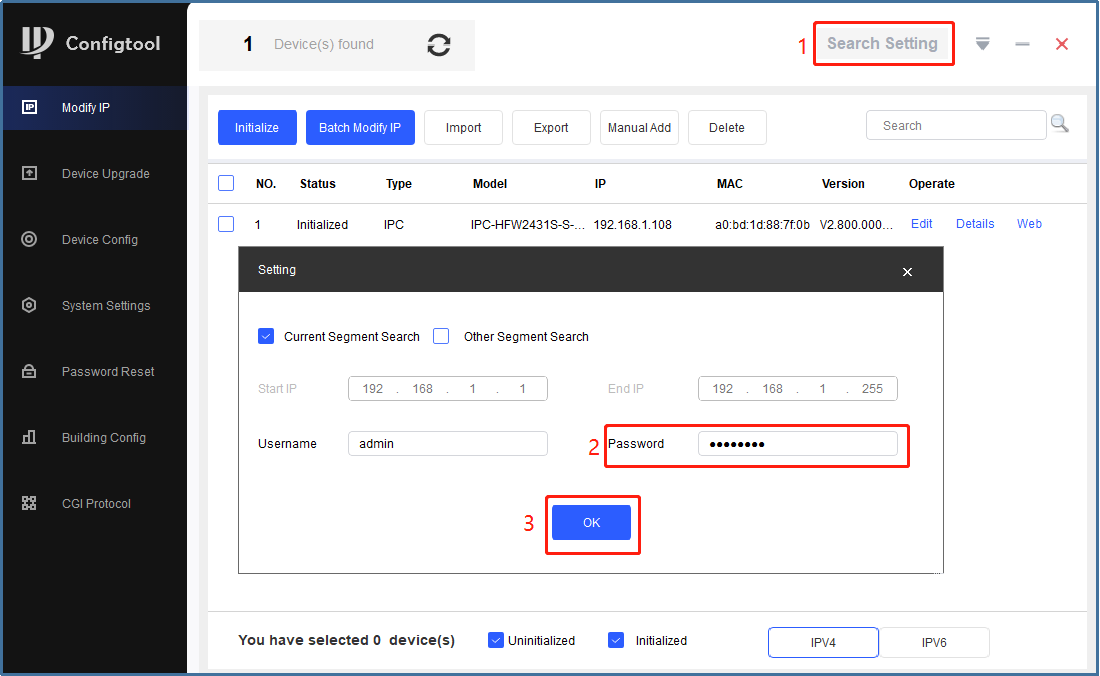
- Entering Credentials: When prompted, enter your camera’s password and click “OK” to proceed. This authentication ensures secure access to your camera’s settings.
- Identifying the IP Address: The tool will display your camera’s IP address. Make sure to note this down accurately, as you’ll need it for future reference when connecting to the NVR.
Step 3: Adjusting the Camera’s IP Address
To ensure smooth compatibility with your Hikvision NVR, it’s vital to adjust the camera’s IP address. pls don’t forget to follow these steps:
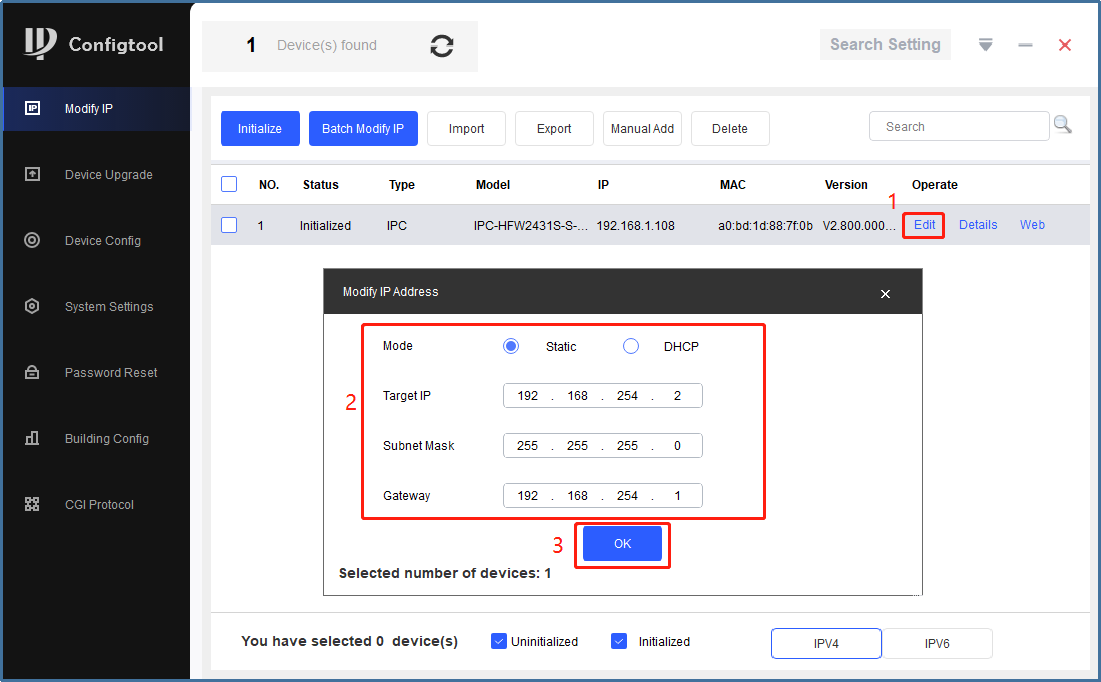
- Editing and Modification: Within the ConfigTool interface, select your camera and navigate to the “Edit” section. This section allows you to modify network settings.
- IP Address Configuration: Change your camera’s IP address to a value within the range of
192.168.254.2to192.168.254.254. Additionally, set the gateway to192.168.254.1. This specific IP range ensures that your camera and NVR are on the same network segment, facilitating seamless communication. - Confirmation and Application: After making these adjustments, confirm by clicking “OK” and apply the changes using the checkbox (√) option. This step finalizes the network configuration, preparing your camera for integration with the NVR.
Step 4: Accessing and Configure The Camera Settings
With the network settings adjusted, the next step is to access your camera’s settings via a web browser for further configuration:
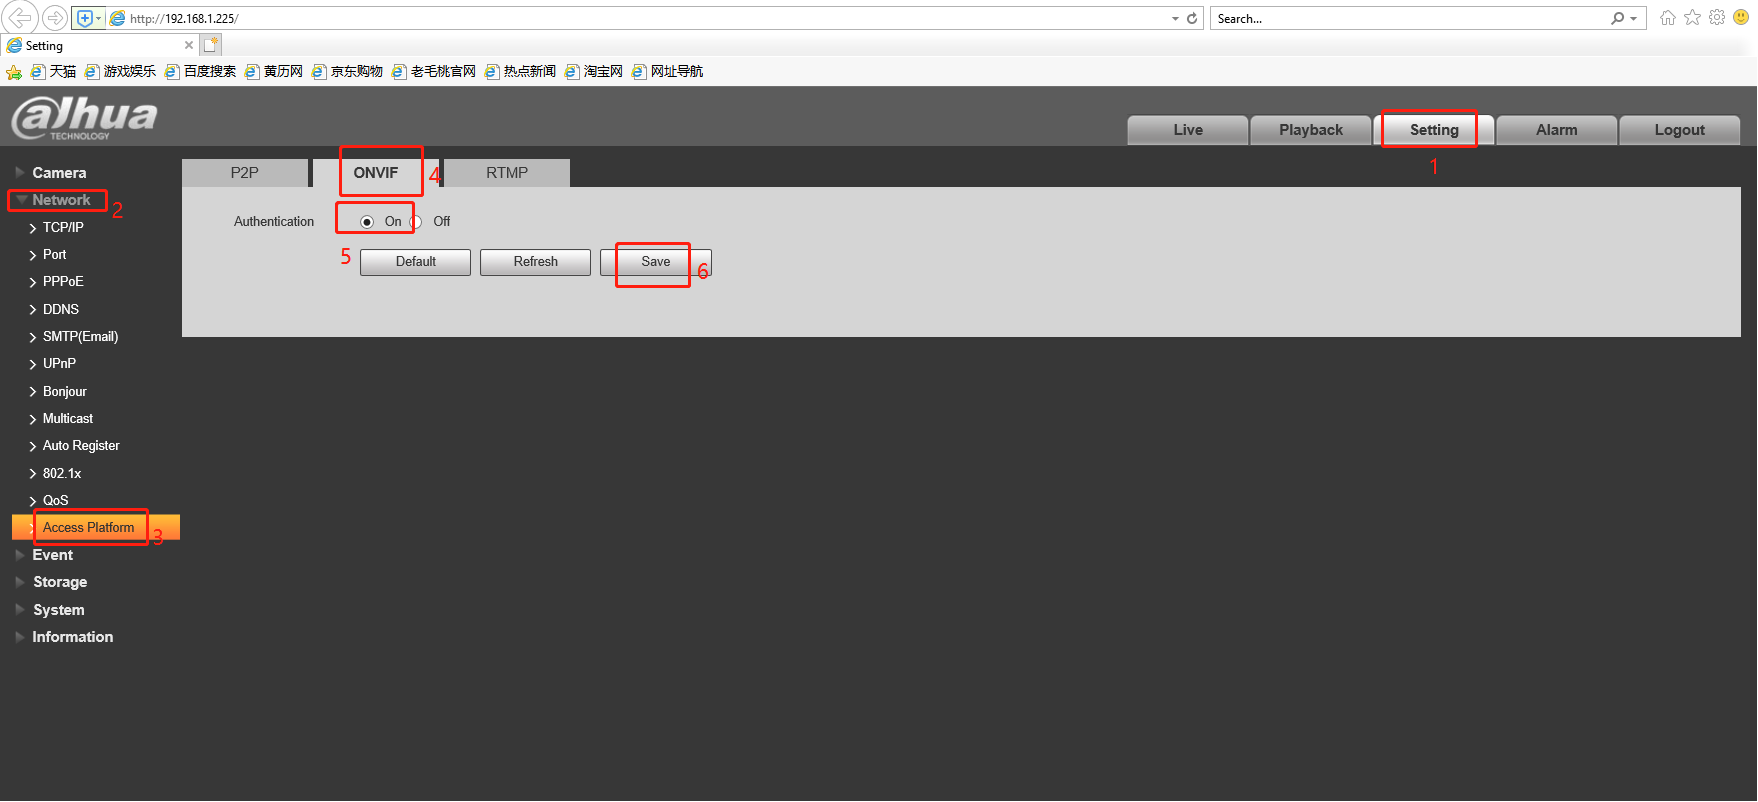
- Browser Interface: Open Internet Explorer and input the modified camera IP address into the address bar. This action will direct you to the camera’s web interface.
- Web Interface Login: Log in to the Dahua camera web interface using your credentials. This interface provides access to a range of camera settings and configurations.
- Activating ONVIF Protocol: Within the camera settings, ensure the ONVIF protocol is enabled. ONVIF is a standardized protocol that facilitates interoperability between IP-based security products, making future integration with the NVR smoother.
Step 5: Establishing Connection with Hikvision NVR
Now that your camera is properly configured, the next crucial step involves connecting your Dahua security camera with a Hikvision NVR. Follow these steps:
- Physical Connection: Connect your camera to the Power over Ethernet (POE) port on the NVR. This connection provides both power and network access to the camera.
- Accessing NVR Interface: On your computer, open the Hikvision NVR web interface. This interface allows you to manage and configure your NVR and connected devices.
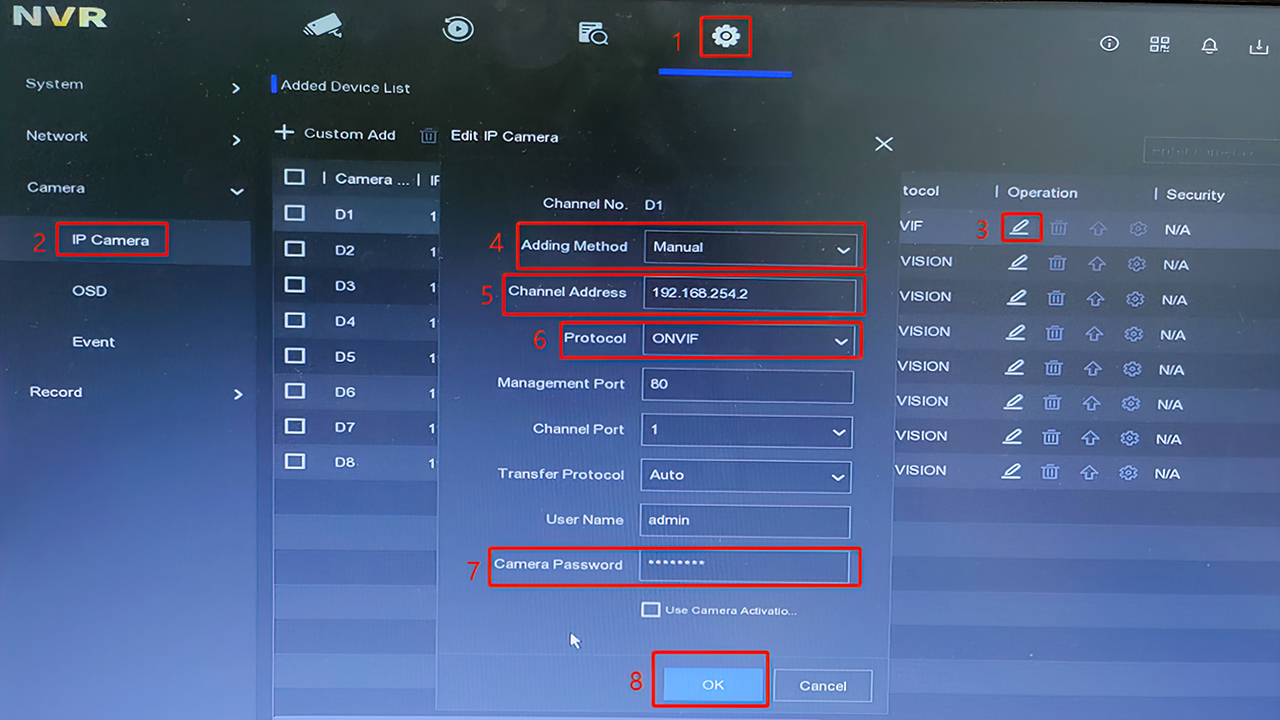
- Configuring NVR Settings: Right-click within the interface to access the menu, then navigate to Configuration > Camera > Edit. This section enables you to add and manage connected cameras.
- Manual Configuration: Select the “Manual” option to manually input your camera’s settings. This method gives you precise control over the connection process.
- IP Address and Port Input: Input your camera’s IP address (
192.168.254.2) along with the ONVIF port. Accuracy in this step is crucial for establishing a successful connection. - Password and Confirmation: Provide the required IP Camera Password and confirm the settings by clicking “OK.” This finalizes the connection between your camera and NVR.
Step 6: Finalizing Integration and Live View
With all settings configured, the final steps ensure the integration is complete and enable live viewing:
- Integration Confirmation: You should receive a confirmation indicating the successful addition of your video camera to the Hik NVR. This confirmation verifies that the connection has been established correctly.
- Live View Access: Within the NVR web interface, navigate to “Live View” to access and view the camera’s feed. This step allows you to verify that the camera is functioning properly and streaming video to the NVR.
Contact VIKYLIN for Professional Support
Need help during the integration process? As an authorized Dahua dealer and Hikvision distributor, VIKYLIN offers offers Dahua and Hikvision surveillance products with comprehensive support to ensure your surveillance system runs smoothly. Contact us via our official website for quick support.
Conclusion
By meticulously following each step outlined in this guide, you can seamlessly connect your Dahua surveillance camera to a Hikvision NVR. This integration not only enhances your security infrastructure by combining high-end camera footage with robust NVR capability but also streamlines management, resulting in a robust and comprehensive surveillance system that meets your security needs effectively.