


Dahua security camera are at the forefront of modern surveillance solutions, offering reliability and innovation. Optimizing their functionality involves mastering the configuration of FTP (File Transfer Protocol). FTP facilitates seamless storage and retrieval of recorded footage, thereby enhancing the camera’s capabilities. This guide will take you through the process of setting up FTP for Dahua IP security camera, ensuring secure and efficient storage of invaluable recordings.
How To Setup FTP For Dahua Camera?
Step 1: Gathering FTP Server Information
Begin by collecting essential FTP server details: the FTP IP address, port number, and login credentials (username and password). Importantly, align the FTP IP with your computer’s IP address. This initial step establishes the foundation for a successful connection between the camera and the FTP server
Step 2: Accessing the Dahua Camera Interface
- Launch your preferred browser, such as Internet Explorer (IE).
- Input your Dahua camera’s IP address and the associated account password to access the camera’s interface. This access is essential for configuring the camera’s settings.
Step 3: Navigating to FTP Settings
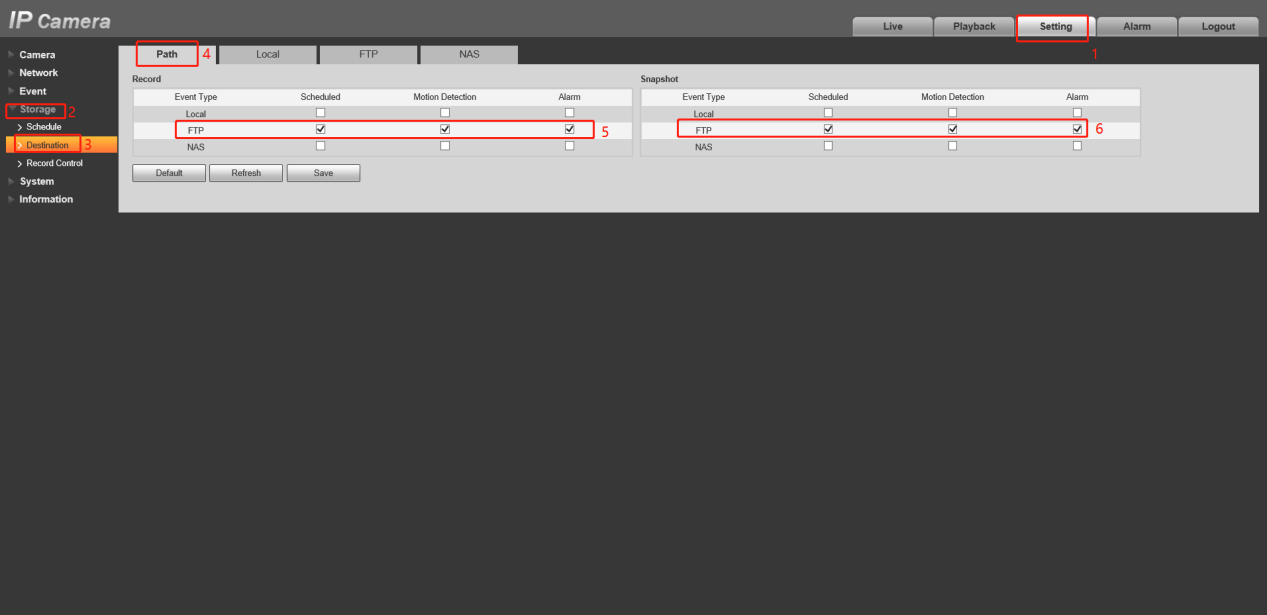
- Within the camera’s main interface, locate and click on “Setting.”
- Navigate to “Event,” then proceed to “Storage.”
- In the “Storage” section, select “Destination,” followed by “Path.”
- Opt for “FTP-Save” as the designated storage destination.
Step 4: Configuring the FTP Server
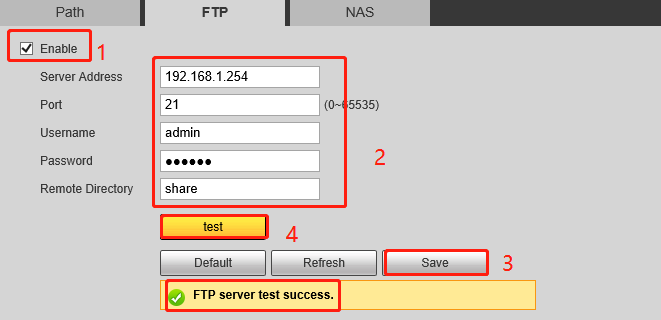
- Activate FTP functionality by enabling the corresponding option.
- Input the FTP server details gathered earlier, including IP address, port number, and login credentials.
- Once entered, save your configurations to ensure they are retained.

Step 5: Testing and Finalization
Thorough testing of the FTP configuration is crucial to confirm seamless setup and reliable transfer of recordings. Follow these steps:
- Click the “Test” function within the FTP settings interface.
- This test verifies the connection between the camera and FTP server, ensuring data accuracy.
- Upon a successful test, save your configurations once again to confirm the settings.
Conclusion
Configuring FTP settings for your IP security camera is a critical step towards maximizing its capabilities and safeguarding vital recordings. By meticulously following these steps, you can seamlessly integrate your camera with an FTP server, streamlining the management and retrieval of surveillance footage.